Tips on Bar Tips
The following information will help you get the most from your bar tip and help you trouble-shoot tip problems if they occur.
What Causes A Bar Tip to Fail?
While most bar tips give a long service life, sometimes a tip will only last a few days. Occasionally this is caused by a faulty bearing, but more often it is caused by pinching the tip in a cut. Pinches are the “kiss of death” to bar tips. Most tips never have the opportunity to wear out. For many pro saw users, the service you get from your bar tip is the interval between severe tip pinches or in other words, it has a lot to do with your skill as an operator and luck.
How to Check For Wear
A severe pinch will often cause a bar tip to sieze up, but if you are a skilled operator and have have avoided severely pinching your bar tip, it may be wearing out. To check for wear, measure how far the tip sprocket holds the chain above the rails on the bar's tip. It should measure at least 1/32" of an inch. If it is any less, the tip should be replaced, even if it still spins. Don't wait for it to seize up before you replace it.
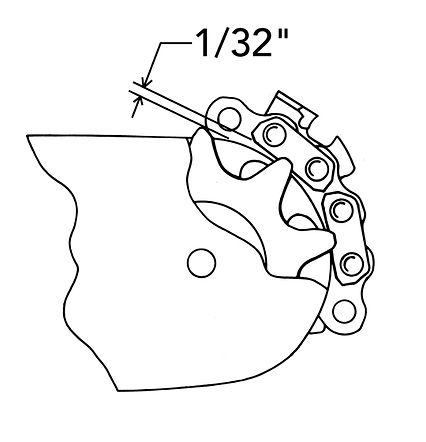
The points on the sprocket should hold the chassis of the saw chain at least 1/32" above the rails of the bar nose.

This is still a serviceable bar nose, but it is showing signs of use. Notice the wear near the sprocket where the chain enters and exits the rails.
Tip Changing
Today’s bar tips are fairly easy to replace. Oregon tips are held in place by a single large rivet. Some people use their bench mounted chain breaker as a press to remove them, but we haven't found this to be the best way. Even a slight misalignment will cause the punch to break. It's true, the punch is inexpensive and easy to replace, but it is frustrating when this occurs, especially if you don’t have a spare punch.Instead, the method we use is to drill the top of the rivet to weaken it, then we drive the rivet out using a hammer and hand punch. We do this on an anvil attached to a heavy work bench.
Some tips are held on by as many as five rivets. No matter how many rivets a nose has, either method for pushing them out will work. Whether you choose to use your bench mount breaker or the hand punch and hammer method, be sure to use eye protection. There is a lot of pressure involved in either process. If you break a punch or fracture the tip on your bench mount breaker, fragments will fly.
On most bar noses, the rivets can be removed from either side. When we remove them, we begin by placing a dimple in the center of each rivet with a center punch. If you are drilling the rivets, this dimple will help you start the relief in the center of the rivet. Reliefs that are not centered make the rivet more difficult to remove. If you plan to salvage the tip you are removing, you don't want to drill any relief into the nose itself.
When removing the tip from an Oregon bar, first look for an “X” in the area next to the the rivet. If you don’t see it, flip the bar over. You will find it on the other side. This rivet has an internal shoulder and the “X” marks the side you should be working on. Because the rivet has a shoulder, it is difficult to remove if you try to push it out from the wrong side.
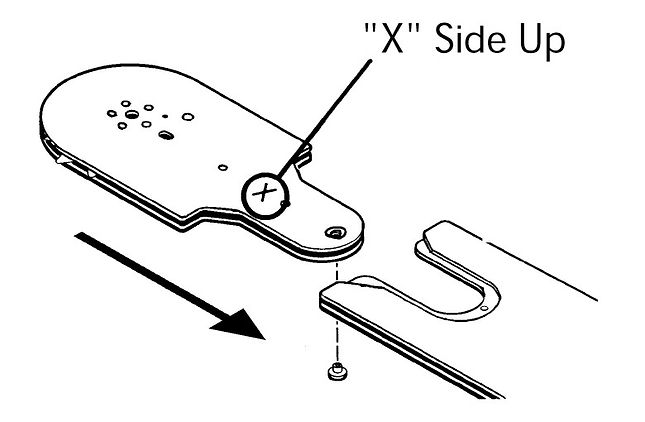
Look for an "X" on the bar nose. The rivet has a shoulder on it and must be removed and installed from this direction.
Once the rivet is removed, the tip will slide out. If it is tight and doesn’t want to come out, put the tip in a vice and pull on the bar. Sometimes getting the old tip to come out takes some work.
Next, slide a new tip in place and install the new rivet. The top of the new rivet should be protruding from the side that has the “X” on it. With the bar laying on a flat and solid surface, peen the top and flatten the rivet. Make sure there are no ragged edges on the rivet that would keep the bar tip from sliding through a cut.
Once a new tip is in place, take a look at where the bar rails meet the tip's rails. If the bar is fairly new, they may match with little or no fitting. If the bar has had a lot of use, the rails on the new tip will probably be taller than those on the bar. When this occurs, it is necessary to grind or file the rails on the tip so they meet with the bar body. The transition from the tip to the bar must be smooth.

If the rails on a new nose are taller than the rails on the bar's body, file them so the transitions are smooth.
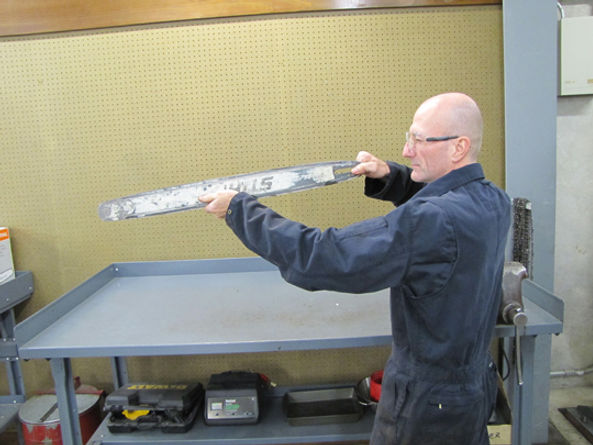
To check how straight a bar is, look down it like you would the site on a rifle. From this perspective you can easily determine if your bar is straight or not.
This is also a good time to check if the nose is straight. Sometimes when you hammer on the rivet(s), the nose will curl from the impact. Before you reinstall the bar on your saw, check it. Hold the bar at eye level and sight down the rails as if they were a sight on a gun. You can do this from either end. You may be surprised how even a slight bend is visible from this perspective. If you find the tip has curled, straighten it before you reinstall the bar on your saw.
If you are installing a tip that has several rivets, try installing half in one direction, then flip the bar over and install the others from the opposite side. This way you are hammering equally on both sides of the bar, which will eliminate much of the “curl.”
Is The Machining Plug Is In Place?
This is a good time to check to be sure the aluminum plug is still in machining hole near the bar tip. This plug fills a small “blanked” hole that was originally used to hold the end of the bar during manufacturing. If this plug falls out, the hole tends to collect chips. You wouldn't think this was a big deal, but surprisingly, when the plug is missing, the tip will hang up in the cut. Few saw users realize how important this plug is. If you have a bar that is missing this plug, either rob one out of an old bar, or contact us for a replacement.
Bar Groove & Oil Hole Cleaning
Any time you change a tip, take a minute and clean the wood chips from the bar groove and make sure the oil hole is open. This can be done with a groove cleaner or even a pocket knife. Having a clean bar rail groove helps move oil down the bar. This is good for both rail and tip lubrication.
It is also a good idea to clean the bar groove and tip area after doing any grinding on the bar. When fitting a new tip or just running the rails, grinding wheel abrasive will accumulate in the bar rails. When left there, the chain’s drive links will pick it up. This is not good for bar rails nor the bearing in the bar nose where much of it will end up.
Tip Lubrication
How often should I grease my bar tip? or Why doesn't my tip have a grease hole? These are two questions we are often asked about bar tips. First, it is a good idea to grease a tip when it is new, but after that, experience has shown it will survive with only the lubrication it gets from chain oil.
Some users have found periodic tip greasing can actually cause tips to fail. The engineers at Oregon believe this is caused by debris getting pushed into the bearing during lubrication -- not the grease. Debris accumulates in the grease hole and lubrication passage. When the tip is greased, this debris travels with the grease into the bearing. Other manufacturers have found this, too, which is why some bar tips are made without lubrication holes.
Copy Cat Tips
If you are having problems with your bar tip, watch what you are buying. There are “clone” tips on the market that look like genuine noses, but are not. In the case of Oregon noses, these “copy cats” look so similar, it is difficult even for us to tell the difference. Honestly, some of the clone tips work pretty well, but some are pure junk. Knowing which are which is the hard part. Saving a few bucks is always good, but in some cases clone tips are sold by shops at full price. Beware.
Our Advice
• Buy branded bar tips -- get Oregon noses for Oregon bars, and so on. Look for OEM packaging or ask the person you are buying it from if it is a genuine part. If you want to try a clone, know what you are buying and if there are any savings to be had, make sure they end up in your pocket.
• If your bar tip has a lubrication hole and you choose to grease it periodically, remember to clean out the debris first.
• If you plan to only grease a tip when it is new, be sure to use good quality bar and chain oil in the saw. It is also a good idea to keep your bar groove and oil hole clean. This is the channel that delivers oil to the bearing in the tip.
• Pinches are what kill bar tips. Make an extra effort to avoid pinches and your bar noses will reward you with much longer life.
As always, we hope this information is helpful. Hopefully you picked up a pointer or two on bar tips. Also, thanks for the feedback and many positive comments. You ask, and we’ll keep it coming. That’s why we’re the Pro’s Choice.