How To Use An Alaskan Saw Mill
An Alaskan saw mill is a great tool for wood workers, builders, and outdoorsmen. It gives them an inexpensive way to turn a chainsaw into a lumber making machine. Whether milling beams in a remote site for a cabin or harvesting special wood for musical instruments, the Alaskan saw mill is a versatile tool. With the knowledge of how to set up and run a mill, you'll be ripping logs before you know it.

How To Begin The Cut
The first step in preparing a log for cutting is setting up slabbing rails. These rails are what the mill rides on when making its first cut. Since the top of a log is round and uneven, they provide a flat and smooth surface that guides the mill. Slabbing rails must extend beyond the ends of the log so the mill can begin and end the cut with support. The rails are usually made of two long 2x4s or 2x6s. Slabbing rail brackets made of steel are usually nailed on the ends of the log and support the wood rails.
When setting up the rails, it is important to consider the log's taper and any other unique feature you wish to avoid or highlight. Like the first step in any operation, time and attention is important because it provides the foundation from which the rest of the log is milled.
Once the cut begins, it may be helpful to install small wedges in the kerf behind the saw. This keeps the cut from collapsing on the bar and chain. Once the initial cut is complete, the slabbing rails are removed.
The Second Cut
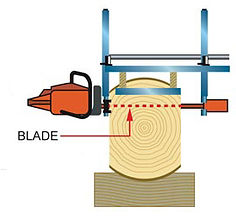
On the second cut, the mill uses the surface you just created to support and guide it. If the log is to be sawed into lumber or beams, the second cut is taken on the bottom of the log. This will produce a second flat surface that is parallel with the first.

If the log is going to be made into partially finished lumber, the second cut may be made below the first at any depth the user desires. Often woodworkers, who are cutting material for furniture or instruments, prefer to cut partially finished lumber with their saw mill. This allows them to mill a tree where it fell, then easily move portions that can easily be moved or handled. Often partially finished lumber is seasoned before it is cut into boards. This gives the woodworker the ability to select and control the quality of the final product. It also gives him the ability to make final cuts with a band saw or some other saw that takes a thinner kerf than a chain saw. This is important when working with figured or other high-value wood. A chainsaw can produce a lot of expensive wood chips!
The Third Cut
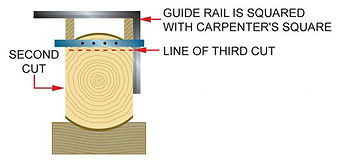
If the log is going to be milled into finished lumber with the saw mill, the next step is to turn the log 90º. Once turned, the slabbing rails are again placed on the top of the log. The rails are squared with a carpenter's square to insure the sides will be at right angles to each other.


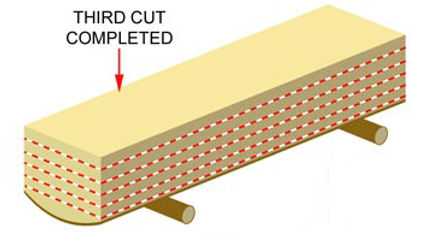
Once this is set up and checked, the third cut can begin. When this cut is finished, remove the slabbing rails from the top "round" and set them to the side. You now have have a partially square log with three flat surfaces.
If you are going to cut planks at this width, your mill will be guided by the surface of the cut you just made. All you have to do is set the depth to the thickness you desire. The log may now be cut into boards.
Our Advice
This is a quick description on how the mill works. Now that you know the basics you may want to explore more sophisticated setups. The mill can be used in many ways. For example, cutting beams or bevels requires additional steps.
The mill is really just a guide, so you are only limited by your ingenuity when it comes to ways it can be used. For more information, check out: www.granberg.com. They are the manufacturer of the Alaskan saw mill. They have more information, including video of the Alaskan saw mill at work. There are other sites on the Internet with useful information, too.

Short Video of a Madsen's employee running a saw mill.
